เครื่องวัดฝุ่น PM2.5 ด้วย เซ็นเซอร์ GP2Y1014AU
บทความนี้ กล่าวถึงขั้นตอนการทำงานโปรเจค เครื่องวัดฝุ่น PM2.5 กับ Arduino UNO โดยใช้ เซ็นเซอร์วัดฝุ่น PM2.5 Keyestudio GP2Y1014AU ของ Sharp เซ็นเซอร์ฝุ่นนี้มีขนาดเล็กและสามารถตรวจจับฝุ่นละอองและอนุภาคควันในสิ่งแวดล้อมได้ ใช้พลังงานน้อยมากในขณะที่ทำงานจึงเหมาะอย่างยิ่งสำหรับระบบตรวจสอบที่เปิดตลอดเวลา
อุปกรณ์ที่ใช้ในโปรเจค
2. Sensor Shield V 5.0
3. เซ็นเซอร์วัดฝุ่น PM2.5 Keyestudio GP2Y1014AU
4. LCD2004 I2C 20×4 Character LCD Display Module
5. Jumper (F2F) cable wire 30cm Female to Female
ขั้นตอนการทำโปรเจค
1. ทดสอบใช้งาน จอ LCD 20×4 กับ Arduino UNO
ทดสอบใช้งาน จอ LCD 20×4 กับ Arduino UNO ตามลิงค์ด้านล่าง
2. ทดสอบใช้งาน เซ็นเซอร์วัดฝุ่น PM2.5 GP2Y1014AU
ทดสอบใช้งาน เซ็นเซอร์วัดฝุ่น PM2.5 GP2Y1014AU ตามลิงค์ด้านล่าง
3. อัพโหลดโค้ด โปรเจคเครื่องวัดฝุ่น PM2.5
เปิดโปรแกรม Arduino IDE เขียนโปรแกรม หรือ Sketch ตามโค้ดด้านล่างนี้
#include  <Wire.h>
#include  <LiquidCrystal_I2C.h>
LiquidCrystal_I2C  lcd(0x27, 20, 4);
int  measurePin  =  0;
int  ledPower  =  2;
int  samplingTime  =  280;
int  deltaTime  =  40;
int  sleepTime  =  9680;
float  voMeasured  =  0;
float calcVoltage = 0;
float  dustDensity  =  0;


void setup() {

  // initialize the LCD,
  lcd.begin();
  // Turn on the blacklight and print a message.
  lcd.backlight();
  lcd.clear();

  //  Print  a  message  to  the  LCD.

  lcd.backlight();
  lcd.setCursor(0, 0);
  lcd.print("Raw  Signal  Value:  ");
  lcd.setCursor(0, 2);
  lcd.print("Voltage:");
  lcd.setCursor(0, 3);
  lcd.print("Dust  Density:");
  pinMode(ledPower, OUTPUT);


}

void loop() {

  digitalWrite(ledPower, LOW); //  power  on  the  LED
  delayMicroseconds(samplingTime);
  voMeasured  =  analogRead(measurePin);  //  read  the  dust  value
  delayMicroseconds(deltaTime);
  digitalWrite(ledPower, HIGH); //  turn  the  LED  off
  delayMicroseconds(sleepTime);

  //  0  -  5V  mapped  to  0  -  1023  integer  values
  //  recover  voltage

  calcVoltage  =  voMeasured  *  (5.0  /  1024.0);
  dustDensity  =  1.7  *  calcVoltage  -  0.1;
  lcd.setCursor(1, 1);
  lcd.print(voMeasured);
  lcd.setCursor(9, 2);
  lcd.print(calcVoltage);
  lcd.setCursor(14, 3);
  lcd.print(dustDensity);

  delay(1000);

}
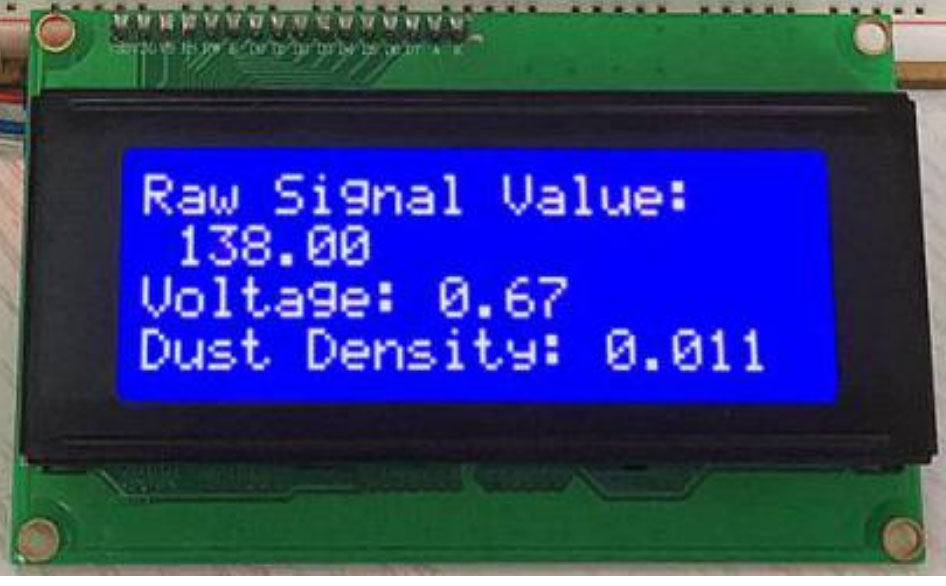
4. ผลลัพธ์การทำงาน

ข้อมูลเปรียบเทียบกับคุณภาพอากาศ:
3000 + = Very Bad
1050-3000 = Bad
300-1050 = Ordinary
150-300 = Good
75-150 = Very Good
0-75 = Tiptop
นี่คือแผนภูมิเปรียบเทียบความเข้มข้นของฝุ่น
ตรวจสอบได้ไหมว่าค่าความเข้มข้นของฝุ่นอยู่ในระดับใด?
ในการทดสอบของเราตอนนี้ค่าที่วัดได้แสดงให้เห็นว่าคุณภาพอากาศดีมาก (Very Good)


